Tuesday, July 6, 2010

Pojagi Panel #2


For this, my second pojagi panel, I used two colors of shot cotton, a magenta and a peach... Neither are colors that I am currently drawn to, but I thought they would work well in this venue.


Using 2 colors instead of 1 allowed me to play a bit more with the stained glass effect that this type of patchwork offers.


The piecing is all improvised, (I'd go insane if I had to sew something like this from a pattern!)


The seams on this panel were done differently then on my first panel, (which you can see here). To learn how the seams were stitched on both panels, see my tutorial in the post below!

Pojagi Machine Stitch Seam Tutorials

In hoping that some of you may want to explore pojagi style patchwork as well, I thought it would be helpful to post tutorials on the two types of seams that I have been using in creating my pojagi pieces.

I've broken with tradition and have chosen to machine stitch these panels, but remember, pojagi is traditionally done by hand, so feel free to use these methods with hand stitching, too!

The first tutorial is how I made the seams on my previous panel shown in the post below. The second tutorial is what I used on my most recent panel, shown in the post above.

(It probably would have been much more helpful had I used two different colors of fabric... sorry about that!)


Tutorial #1:

Note: This is a non-traditional method, but it offers a unique way of creating seams and in my opinion, has a more utilitarian/work-cloth look and feel. It has fewer steps then the second approach, but is actually a bit more time consuming to do.


1. Place 2 pieces of fabric, right sides together, lining up the top edges. Sew a 1/2" seam allowance.


2. Press seam allowance open.


3. Fold both raw edges of seam allowance in and under. Press flat with a hot iron.


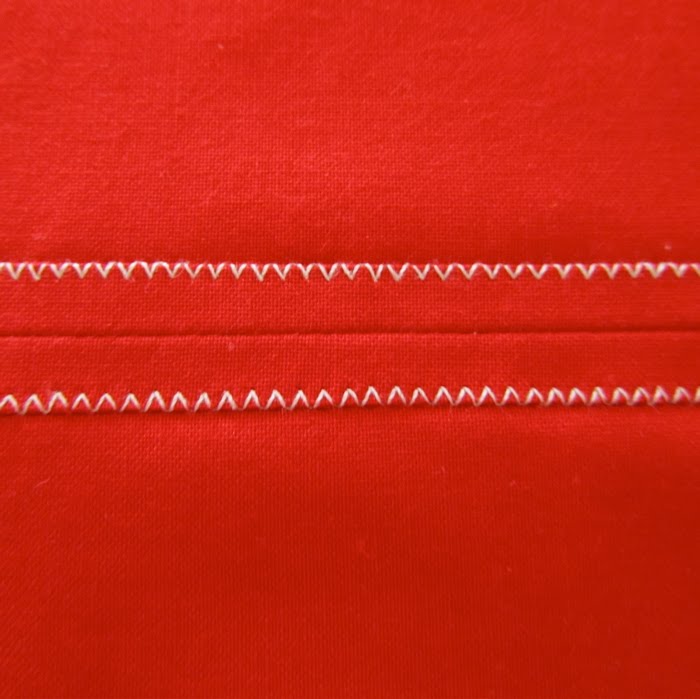
4. Stitch both folded edges of seam allowance down. (I used a zig zag stitch, but you can use a blanket stitch, or a straight stitch... or what ever rocks your boat!)


This is what it looks like on the other side. (Technically this would be the "right' side.)


Tutorial #2:

Note: This method goes faster the the first method and offers a more traditional pogaji look. I adapted it from a tutorial that I found on mairuru. You can see her hand stitched version here


1. Position 2 pieces of fabric, right sides together, with the bottom fabric raised 3/8" higher then the top fabric.


2. Using the top edge of the top fabric as a guide, sew a 1/4" seam allowance.


3. Fold extended edge of bottom fabric over the top fabric, lining up the fabric edge to the stitched seam. Press with a hot iron.


4. Flip the top fabric upwards, so it is now on top of the folded seam allowance. Press flat.


5. Flip the 2 fabrics over and you will see your stitched line and the folded flap of the seam allowance.


6. Staying as close to the folded edge as possible, stitch the seam allowance down. You have now completed one seam. As you can see, there are two stitched lines on this side...


... and one stitched line on the other side. (Technically this would be the "right" side.)

Hope this makes sense!

Wednesday, June 23, 2010

Playing with Pojagi

Still playing with Pojagi inspired patchwork...


Because all of the seams are folded in and stitched down, both sides can be displayed...


I think that the stitched patches and seam work really give the cloth a wonderful utilitarian feel...


This shot cotton was woven with green and yellow threads, producing a beautiful chartreuse color...


By alternating the direction of the grain on the individual patches, sometimes, (depending on how the light hits the cloth) some patches appear more green based, and some more yellow based...


And of course, hung in the window creates a totally different look...


This Pojagi Inspired Utilitarian Patchwork Panel/Runner is currently available in my shop. Note: Now sold.

Friday, June 18, 2010

Breaking the Shell


Many thanks to you all, as I was really touched and encouraged by the comments left after my last post. By that evening things started to become clearer to me, and the shell began to crack open. I realized that the reason I was having a hard time translating the lines and shapes that were in my mind into quilts, is because this time, I wasn't suppose to put them into quilts... I was suppose to just put them into cloth.


Wanting to keep going with the theme of utilitarian patchwork, I turned to Pojagi, (which is a type of Korean patchwork, often used to make square wrapping cloth) for inspiration.

Traditionally, (from what I can gather) Pojagi is constructed with hand stitched french seams, that are then tacked down with very small hand stitches. However despite my love of hand stitching, I knew that I didn't want to do it that way, (as I tried it once and didn't like it!)

I kept thinking about it and as I fell asleep I saw how I might do it on the machine, and the next morning I woke up and started to create a humble little panel out of muslin.


I joined my patchwork with machine stitched traditional seams, pressing them open, and tucking the raw edges in, then stitching them down... (and I enjoyed the process very much this time!)


To continue the play of light and shadow that this work encourages, I also added a little pocket where a leaf can be tucked into.

Now my mind is expanding with new ideas, and it feels wonderful. My next experiment with this construction method will be a long and narrow cloth runner made with shot cottons. Can hardly wait!

Wednesday, June 16, 2010

Incubating

I'm sorry for being so quiet lately. I'm stuck in one of those incubation stages. Sometimes something wonder gets born from these periods and it all seems worthwhile. However, sometimes nothing new seems to emerge, I go back to whatever I had been working on, and the whole incubation period feels like a colossal waste of time.


I walk around lost in my thoughts, trying to process shapes and lines, Like the ones I see in these old barn structures... but when I try to translate them into cloth I just seem to make a mess. This leads me to eat copious amounts of ice cream and potato chips, and wonder out loud why I don't drink more.


So please bear with me and my lack of blogging, as this is part all a part of my normal process... though I find it the most difficult.

~~~~~~~~~~~~~~~~~~~~~~~~~~~~~~~~~~~~


I do have a bit of stitching from someone else to share with you though...


This lovely piece was created by Kaye Turner of Stitching Life.


She offered it in a blog giveaway, and lucky me... I won! The stitching is beautifully done, and even tough it's intended as a bookmark I think it deserves to be hung on the wall.

You can find more of Kaye's wonderful stitching here