Wednesday, December 18, 2013

Rimmed in Red: Working in a Series Article

The days have been flying by, filled with non-creative have-to's and must-do's... not a whole lot of want-to's. We are over halfway through December already, and I was starting to wonder if I would have anything of interest to share with you this month.


But much to my delight, I can now share this...


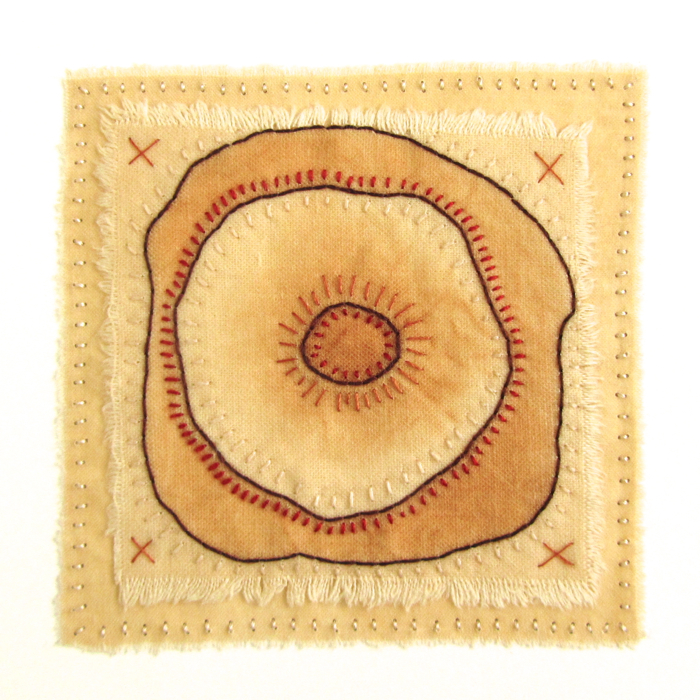
A few months back, I was contacted by the Editor of Art Quilting Studio and asked if I would do an article on my "Rimmed in Red" pieces, which I did back in 2011, for the Winter 2014 issue.


I decided this would be a great opportunity to write about working in a series, something I greatly enjoy doing. Even if I only produce a small body of work in a series, it feels bigger because each piece is part of a larger vision. I also know that I can revisit any series at any time, picking up where I left off, reworking old ideas with new ideas.


In the article, I share a bit about the process behind this series, as well as a few helpful tips for beginning and creating your own series of works. If you have never worked in a series before, I hope you will check out the article and give it a try, it's truly a wonderful way to work. And be sure to check out the other articles... lot's of creative inspiration to be found! 

(Also, if interested I still have two unsold pieces left in this series which you can find here and here.)

~~~~~~~~~~~~~~~~~

P.S. If I don't get a chance to post again before the holidays, I hope you all have happy ones!
xo

Friday, November 8, 2013

The Obsession Continues

My quilted fabric bead obsession continues...


(Which is good, as they are now selling almost as fast as I can stitch them!) 

I've been experimenting with different fabrics, quilting stitches and sizes...

Below are some examples of beads made from batik fabric,
 ( Yay! a great way to use up that stash I bough years ago!)


Here, on the beads pictured above, the quilting is done in short rows going around the beads, creating a semi textured bead.


Pictured above and below, I chose to do an all-over random seed stitch on these large size beads,


which results in a more textured bead, sort of like an old quilt would have. 
(This would be fun to do with some vintage fabrics!)


And on the batik beads above, I decided to stitch the rows length wise, 
which gives the least amount of texture, but has a lovely, kantha like look.


I repeated that straight stitch on these pretty pink Japanese fabric beads.


(I think they are so cute!)


And I had to try making some beads out of dupioni silks!


Love those colors!

That's it for now... I have beads to stitch!

~~~~~~~~~~~~

Note: A Downloadable PDF Tutorial Pattern for my Quilted Fabric Beads is now available in my Etsy shop, here.

Friday, October 11, 2013

The Quilted Bead


The other week, I went to bed trying to think of some new and fun ways to use up left over pieces of fabric and small bits of batting. 


Waste not, want not, is always a good motto, and one I think we quilters take to heart.


In the morning, as I was just coming out of sleep, these quilted beads popped into my head.


I have been mildly obsessed ever since.


Made from strips of fabric, batting and hand stitching, 
they are the smallest quilted items I have ever made, and I adore them.


This is the first batch I did. I began them with Japanese boro and Indian kantha in my mind... 
ragged and patched and lots of stitching. 


Each bead took between 1 to 1 1/2  hours to make. 
Don't let that small size fool you into thinking they are whipped out in minutes. 


No, this is slow stitching and a labor of love. 


However they were hard on my hands, 
which unfortunately are feeling increasingly arthritic on a daily basis.


This is the second batch I have been working on. 


Made from assorted Japanese fabrics, these each take about a half hour to complete and are a bit easier on my hands.


Almost everyday, I select a bead from either batch to go with whatever I am wearing, and string it onto a simple, ball chain. I like that throughout the day, wherever I am, I can reach up and touch the little quilted bead, and instantly connect with something meaningful to me. 


I find it rather, (or maybe, to some, oddly) comforting.


The weather is dreary, rainy and gray, (hence the rather gray photos) 
and I have no where to be today...


So, I'm going to sew some more beads.
Yay! 
(It's like eating potato chips, you simply cannot stop after just one)!

~~~~~~~~~~

Note: A Downloadable PDF Tutorial Pattern for my quilted Fabric Beads, is now available in my Etsy shop, here.

Tuesday, September 10, 2013

A Little Stained and Stitched Sample Book


I thought a little sample book of stains and stitches might be nice.


With a torn and stitched strip for a spine, and a thin crocheted band for a handle.


Bits and pieces,


stitches here and there.


Swirls and X's


over pretty colored staines and beeswax infused fibers.


One typed word,


To focus my thoughts.


Seed and fish bone stitches,


and lovely frayed edges


And that's enough.

xo


Tuesday, September 3, 2013

Stain and Scorch


Along with rusting and tea dyeing, I have been thinking a lot about other ways to mark and stain fabric. And I suppose that's what triggered an old memory to pop in my head... 
While driving in the car last week, I suddenly remembered a kid's magic book that I had when I was little, and of one specific trick... how to make invisible ink. 

Do you remember that trick? It involved paper, lemon juice and a lightbulb. (The old fashioned incandescent ones that burned so bright and hot that they could burn your skin off and blind you at the same time. Those sure were the good old days.) The trick was simple... just write a message onto the paper using the lemon juice and let it dry, resulting in a blank and wee bit crinkly piece of paper. Then hold that paper over the hot light bulb and magically watch your message appear! 

This random memory made me wonder if the same thing would happen if fabric were substituted for the paper, and a hot iron for the lightbulb... so soon as I got home, I tried it...

  
Lo and behold, it worked!


These samples above were done by folding the fabric then applying the juice, and the samples below were done by placing spots of juice onto the fabric. 


So why does this work, (on paper and/or on fabric)? 

Well, from what I read, (lots of info on doing this with paper, none that I could find on doing it on fabric) it has to do with certain organic substances, (lemon  juice being one of them) that due to their mild acid content and occurring oxidation, heat up quicker then the paper, (or in my case fabric) resulting in the heat source scorching the areas of the paper, (or fabric) that came into contact with the substance. Orange juice, milk, honey, vinegar, and white wine are some other organic substances that can cause a similar effect.


Because of the mild acid content, I can't say what the long term effects of this method may be. However, lemon juice has long been used to help bleach stains out of fabric. Heck, even Martha Stewart recommends using lemon juice to bleach out stains in your linens... so I am not too, worried about the long term effects.  Just as a precaution though, I did soak all my finished samples in a solution of water and baking soda to help neutralize any acidity, then followed with a hand wash and rinse, and would recommend anyone wanting to try this to do the same before using in projects.

P.S. Be warned, this method can leave scorching on the bottom of your iron's sole plate as well as your ironing board cover, messing them both up, (especially is you are impatient like I can be, and start ironing before the lemon juice has dried)! So, use a cheap or old iron that you don't care about, (you can usually get a  $12 or $13 iron at Target and other stores) and a cheap ironing board cover as well.

Wednesday, August 14, 2013

Fragments

Fragment #2

I started a new series of patched and stitched work this week.
(Always feels good to start a new series!)


The series is called "Fragments" and feature torn bits of the rusted and stained fabrics that I showed in my last post.


I decided to do something a little different, and coat each torn piece in a very thin layer of beeswax. The beeswax gives the bits of fabric a new weight and hand... somewhere in-between fabric and paper.


It also alters the colors, making them a bit richer and at times, almost translucent.

Fragment #1

The bits of torn, wax coated pieces, are then stitched together in a pleasing composition, 

Fragment #3

then stitched onto 140 lb. paper, making them easy to display and frame. 

These were a delight to make, and I hope to get a few more done over the next few days. To see more of Fragments 1, 2 and 3, just click on the links under the photos.

xo