I've broken with tradition and have chosen to machine stitch these panels, but remember, pojagi is traditionally done by hand, so feel free to use these methods with hand stitching, too!
The first tutorial is how I made the seams on my previous panel shown in the post below. The second tutorial is what I used on my most recent panel, shown in the post above.
(It probably would have been much more helpful had I used two different colors of fabric... sorry about that!)
Tutorial #1:
Note: This is a non-traditional method, but it offers a unique way of creating seams and in my opinion, has a more utilitarian/work-cloth look and feel. It has fewer steps then the second approach, but is actually a bit more time consuming to do.

1. Place 2 pieces of fabric, right sides together, lining up the top edges. Sew a 1/2" seam allowance.

2. Press seam allowance open.

3. Fold both raw edges of seam allowance in and under. Press flat with a hot iron.
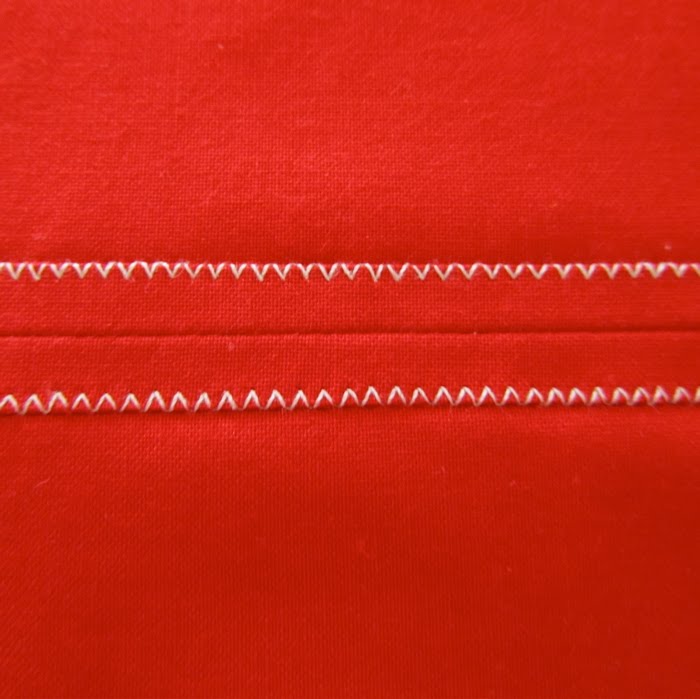
4. Stitch both folded edges of seam allowance down. (I used a zig zag stitch, but you can use a blanket stitch, or a straight stitch... or what ever rocks your boat!)

This is what it looks like on the other side. (Technically this would be the "right' side.)
Tutorial #2:
Note: This method goes faster the the first method and offers a more traditional pogaji look. I adapted it from a tutorial that I found on mairuru. You can see her hand stitched version here

1. Position 2 pieces of fabric, right sides together, with the bottom fabric raised 3/8" higher then the top fabric.

2. Using the top edge of the top fabric as a guide, sew a 1/4" seam allowance.

3. Fold extended edge of bottom fabric over the top fabric, lining up the fabric edge to the stitched seam. Press with a hot iron.

4. Flip the top fabric upwards, so it is now on top of the folded seam allowance. Press flat.

5. Flip the 2 fabrics over and you will see your stitched line and the folded flap of the seam allowance.

6. Staying as close to the folded edge as possible, stitch the seam allowance down. You have now completed one seam. As you can see, there are two stitched lines on this side...

... and one stitched line on the other side. (Technically this would be the "right" side.)
Hope this makes sense!
Thank you. I plan to make one of these soon.
ReplyDeleteAh! Very helpful! I hope to have the opportunity to use this technique some day.
ReplyDeleteThanks for sharing your knowledge!
thank you so much for the tutorial, i will definitely give this a try!!
ReplyDeleteThank you so much for sharing this tutorial - your work is such an inspiration. I hope to try this someday.
ReplyDeleteawesome! thanks for sharing!
ReplyDeleteThank-you so much for sharing these techniques. After I saw your first post on pojagi I tried to find instructions on the net, but didn't have much luck. Cheers!
ReplyDeleteThat’s wonderful Victoria! Thanks so much for the clear tutorial and for sharing about this new to me technique!
ReplyDeleteThank you for the tutorial - I had been figuring out how it was done
ReplyDeleteThis looks like it would be fun to play with a little piece. Thank you for sharing.
ReplyDeleteThank you!! I was hoping you'd do a tutorial! I'm making on of these the second the temperature here goes below 95 degrees. I have an odd window in my hall that needs some interesting detail. Perfect!
ReplyDeleteThanks! I really like this effect and am going to have to experiment sometime.
ReplyDeleteThanks for this tutorial - I love this look and would love to try it!
ReplyDeleteThanks so much - I LOVE seeing how you did these beautiful pieces!
ReplyDeletethankyou for the tutorial, I will have a go at that, its lovely
ReplyDeleteGreat tutorial. Thanks for sharing!
ReplyDeleteThis is so nice of you to share this info!
ReplyDeletelove
ReplyDeleteVery nifty!! Thanks for the tutorials.
ReplyDeletecompletely helpful! Thank you for a tutorial. Your work was so gorgeous, I was hoping to learn the technique!
ReplyDeleteWe have been wanting a stained glass window for our old Victorian house, but it's just out of our price range. HOWEVER, with this technique, I might forge ahead. Your blog/art is very inspiring to me.
I have been trying to figure out pojagi seams for a long time, so THANK YOU.
ReplyDeleteThanks for this helpful tutorial. I think the second version might be what my sewing teacher at school called a 'run and fell' seam. We had to make one and mine wasn't so good but I understand this perfectly.
ReplyDeleteHi, there is an even easier way to sew these seams - using a felling foot. See http://www.scribd.com/doc/31135521/How-to-Sew-a-Felled-Seam-with-your-felling-foot Most antique and vintage machines have these feet.
ReplyDeleteThanks so much for the link, I will check that out!
ReplyDeleteThe seam in the second tutorial is called a "flat-felled seam" and is used in garment making. I probably learned it in Home Ec. class over 50 years ago!
ReplyDeleteI have been trying to find out how to make pojagi and I am so pleased to have discovered your blog. Thank you very much for your generosity in showing how to piece the fabric together and giving links.
ReplyDeleteI posted a link to this tutorial on my blog and made a linen scarf using
ReplyDeleteyour fine instruction. Thank you for
being so generous!
Oh, that's neat! Someone recommended this method after seeing my curtains. I really like the effect and it's so doable. Thanks!
ReplyDeleteCool, thank you! Seems like a variation of French seams, which I love using :)
ReplyDeleteVery clear, thank you! I'll try now
ReplyDeleteThanks for the great tutorial! It took me a while to get the seams as neat as I wanted them, but now I finished a little project for my mother's birthday and I am very satisfied with it :)
ReplyDelete16 months later... I tried your tutorial #2 and love the effect. I'd not made flat-felled seams before, and this method worked great. Thanks for the instructions.
ReplyDeleteWhat you did in tutorial # 2 was "flat fell the seam". There's a special foot that does this automatically. I like the way the overlapped seams look so dark. I've been trying to figure this out for some time, so simple yet it escaped me. Thanks
ReplyDeleteThank you for both tutorials. I was searching for a machine way to create Bojagi-inspired textile panels and yours answered my questions.
ReplyDeleteThank you a lot from FRANCE for your very easy to understand tutorials.
ReplyDeleteI think I will try soon!
Thanks again.
Thanks so much for these tutorials! I'm completely captivated and can't wait to start!! So beautiful and smart too!
ReplyDeleteA great method for working with sheer fabrics
ReplyDeleteA great method for working with sheer fabrics
ReplyDeleteBeautiful
ReplyDelete
ReplyDeleteMy grand daughter is going to make one of these quilts. Her sister and husband are adopting a little girl from South Korea soon and she thinks it worth a try. She is a new quilter but an Art designer . How do you decide on the amount of material to buy? She has little stash. Love the looks of the original ones the Korean women make, what material do they use?
ReplyDeletethank you for this tutorial. I can understand it and the pictures are clear. (Some tutorials are very difficult to understand.)