Follow

Tuesday, November 24, 2015

Barn Bones


I just completed two new small quilts, and I am so happy because I was able to actually hand quilt them, (and it's been a long time since I have been able to do that). If you have been a long time reader of my blog, you may remember that I have mentioned a couple of times my problems with on-going arthritic hand pain. What I didn't say was how the pain gradually increased until I was feeling it throughout my body. I was feeling like I had the body of an 80 year old, and knew something was wrong. I decided to hold off on seeing the doctor and first do a little sleuthing, as my gut instinct told me this had something to do with something I was ingesting.

I thought about what might have changed in my diet over the last two years, (as that is when I first started feeling pain). I quickly realized that was around the time I switched from drinking primarily coffee, to drinking mostly tea. And I was drinking a lot of tea, often 8-10 cups a day, both black and green, both caffeinated and decaf, and brewed pretty strong.

Hmmm....

A quick google search of tea and arthritic pain led me to a lot of hits. Seems that while a small does of tea can be anti-inflammatory and thus helpful, higher amounts can lead to arthritic pain, and that is thought to be possibly caused due to the high amount of fluoride, (yes fluoride) that is naturally found in black and green teas, (but not herbal). 

The fluoride is absorbed into the tea leaves from the soil, (why, I do not know). Old leaves, (black tea) carry the most, while young leaves, (white tea) the least, and green tea falls in the middle. 

(Note: I am no expert in this... and different reports say different things. If you really want to know about  this, you should do your own research, and come  to your own conclusions!)

After finding this all out, I decided to switch to mostly herbal tea, (every now and then I have a cup of black, but not that often.) After doing this for many months, I have found that the hand pain has greatly decreased. I still have a bit in my right thumb, but it no longer feels crippling and searing. And my over all body aches have greatly improved... I think what I feel now is just normal for my age.

And so I tested myself out by doing some hand quilting, and Hooray, Hooray, I was able to do it, (granted on a small scale, but nevertheless, I was able to do it)!!

So now... the quilts...

 Barn Bones no.1

The quilts, "Barn Bones 1" and "Barn Bones 2" were made in response to seeing so many local, beautiful old barns and farm structures dismantled, or neglected and left to fall apart, piece by piece. 


There is a point between the coming down and the all gone, where skeletal beams still stand, and the sky shows through open areas that once stood walls and roofs.  


I admit, I get rather mournful each time one is lost. 


                    And it's an odd feeling to gather inspiration from something that makes me sad, 
                        and then to use that inspiration to make something that makes me happy.


But my hope is to pay some sort of final tribute to those structures, 
some of which once stood humbly, and others that stood rather majestically...
but they all stood with dignity.


Barns Bone no.2

I pay tribute to each of them, for the lives and stories that they witnessed, 
and for the years that they served and survived.

xo


Sunday, October 18, 2015

Scrap Control Mini Quilts

I have decided to embark on a new method of scrap control. 
(Is their really such a thing as scrap control?) 
I don't know, but I hope this is a step in the right direction. 

The idea is that after a project is complete, I must use the scraps right away. 
No saving and holding them for future projects. 


I decided to do this because I have come to realize that when I save scraps for some future, unknown use, I start to feel really bogged down by them after awhile. No matter what form of organization I use, I just feel weighted down my those small, (and seemingly light weight) bits of fabric. 

I feel guilty and wasteful if I throw them out, and resentful of their demand that I DO something with them. And finding a place to store and organize them 
is just a continued drain of time that I would rather spend sewing.

So... why not just make something out of them right away? 
A fun little activity that keeps my creative juices going, while cleaning up my scraps seems like a great way to transition from one project  to another. 


And so here are three little scrap quilts, made from the left over bits of my last project
I'm calling them "Harvest 1, 2 and 3" which seems fitting to me.

Hoping  that  this new method proves workable and more enjoyable to me then collecting my scraps in boxes, bins and baskets as previously done. So far, it feels like a win-win!

What forms of scrap control have any of you found helpful? Feel free to share in the comments!


"Harvest #1" and "Harvest #2"are both listed in my Etsy shop if you would like any further info. Links can be found below.


Friday, September 25, 2015

Unexpected Surprises


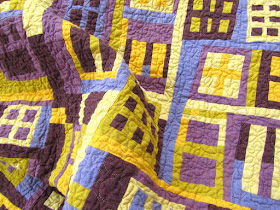
This quilt started off with the idea of experimenting with making
 improv blocks based on the varied shapes of windows. 

I only planned on making a few blocks, just to play around with the concept. So, I pulled some shot cottons including chambrays and crossweave fabrics, all in colors that I wasn't particularly attached to, as I didn't want to "waste" my more favored colored fabrics. 

I figured if I liked where the idea was going, I'd switch over to other more preferred colors. 


(Although I really do dig that one dark mustard yellow, but that's ok, I just went out and got more!)


But here's what happened... each block that I made led me to think of an idea for another block...


and then all of those blocks wanted to be remade in various sizes and color combinations.


        Before I knew it, I had enough blocks to make a quilt, all in colors that I really do not care for,
        (except that mustard yellow).
           
And despite purple and yellow being complimentary colors, 
         I personally do not generally care for them together, 
     (with the exception of pansies)!


                                    Funny thing is, as I looked at all of those blocks together, 
I knew right away that these were exactly the right colors to use all along. 

Bada-Bing-Bada-Boom!
I love how they look together!


That's one of the things I adore about improv... 
being open to unexpected surprises, 
having my sometimes straight and narrow road, tipped on its side, expanded and forever changed... 

All from one simple exercise in creativity using colors I didn't think I liked together.
xo


Saturday, August 8, 2015

Playing with Blocks


The other day I was at a local flea market and found a set of these 16 small vintage wooded building blocks, some with solid colored sides in red, cream, blue and yellow, and some with half square triangle combinations, as shown above. I've wanted something like this for a long time and have been enjoying seeing what different pattern combos I can make. However, the kid in me was wanting more... more blocks to play with, more color combinations, more, more, more!

So, to satisfy that inner child, I devised a creative solution...


Wanting very much to keep the look of the vintage worn edges 
with the pops of surrounding color just like the actual blocks had, 
I first scanned the sides of the blocks. 
Then from those scans, and using Photoshop Elements,  (poor man's Photoshop)
I created the extra HST block combos that were missing. 
I then made a sheet containing a total of 10 different solid and HST "tiles", each repeating 8 times.

I printed out the tile sheet onto sticker paper, (found in home office supply shops) and then adhered the paper to a piece of cardboard, recycled from an old writing tablet, (cereal box cardboard would work great, too.) A few minutes of cutting with my rotary cutter, (I have one designated just for paper) and a clear acyclic quilter's ruler and I had my own set of vintage looking "block" tiles, and am delighted by how much they look and feel like real little wooded tiles!

But,
 (can you believe it?) 
that inner child still was not satisfied 
and wanted more colors to play with.
Sigh

So, I manipulated the colors on that original color sheet,
played around with it here and there...


and came up with 4 more sheets, for a total of 50 different tiles, each repeated 8 times, 
creating a grand total of 400, 1" x 1" tiles! 

(And if that inner child wants more tiles, I can just print out more sheets!)


So now, my inner child and I can have all the fun we want 
coming up with neat and nifty quilt block designs and interesting color combinations!


If you would like to try this idea, please do.
It's not hard and lot's of fun!
(And cool for kids to use as well!)

However, if you would prefer to not go through the trouble of creating your own tile sheets, 
(as that can be rather time consuming) 
I am offering an instant downloadable PDF version in my shop here
It contains all 5 color sheets, along with simple instructions and printing ideas, 
(like how to make actual 3-D blocks from these tiles and creating magnetic tiles.)

Have a great weekend, and don't forget to let your inner child play!

Friday, July 10, 2015

Something Quaint and Quirky


It was bound to happen.
I had to do it. 
Marry punch needle with quilting.


This little punch needle embroidered horse needed a home, 
so I stitched him a tiny crazy quilt, just 11" high 
and stuck him in the middle 
where he can happily spend the rest of his life.


The horse started off as a simple traced shape 
from one of those vintage cookie cutters I posted about here.


The tiny quilt is made from assorted pieces of chambray shot cottons,
 all in various shades of grays, with tiny red zig-zag stitching.


This was a fun piece to make, a little quaint and a little quirky.
I might just do some more.

Hope you all have a lovely weekend!

Wednesday, July 1, 2015

Tobacco Road Quilt


"Tobacco Road" is the 3rd completed quilt in my "Lancaster County" series.


Just like the two before it, (see here and here) it takes its name from a local road, and it reflects my personal impressions of the shapes, colors and mood of this wonderful area.


Made from some cotton prints and assorted shot cottons, including some wonderful chambrays from Andover Fabrics, which are my currant favorite fabrics right now.

On all of the quilts in this series so far, I've included the exposed seams of some of the woven chambrays, as I think they are just too lovely to cover up.

I adore the subtle color changes, and the tiny flaws and imperfections, 
like that little area in the mid-upper right, along that blue selvedge shown in the photo below... 


I'm embracing these parts as they help reflect so tenderly the mood that I am trying to convey.

I bound the quilt with a pretty striped fabric.
It was an afterthought, once the quilt was completed, pulled from stash.
Much to my delight it reflects many of the colors used in the quilt's patchwork.


More details of my Tobacco Road quilt can be found here.

xo


Wednesday, June 24, 2015

Cookie Cutter Inspired

In a recent post on my new Lancaster County inspired quilt series, (third one is being quilted now!) 
I talked briefly about inspiration, (a favorite topic of mine) and asked for commenters to let me know what inspired them, as I am always fascinated by the creative process and what sparks it. 

Today's post continues the inspiration theme in a fun way, I think!


I've been soaking up a lot of inspiration from folk art lately, specifically vintage hooked rugs, 
which have always intrigued me and are proving to be very inspiring 
with the punch needle embroidery that I've been exploring. 
Love the colors and those shapes... 


Yes, those wonderful shapes!
One of the things that I have noticed in these old hooked rugs is how so many of them feature very naive style shapes, including various animals and birds, flowers and leafs 
along with hearts, diamonds, clubs and spades. 

All of which remind me of...


Cookie cutter shapes!


So, that got me to thinking about how wonderful it would be to have an assortment of vintage cookie cutters to use as design inspiration. These shapes could be used for not only punch needle, but other types of embroidery as well, along with appliqué designs for some future folk art quilts.


And that realization led to some of my local vintage shops, 
(lucky me, I live minutes away from a 5 mile stretch of them!) 
for a fun scavenger hunt to find some awesome
cookie cutters...


The photo above and the photo below show about half of what I ultimately found.
Most cost between .50 cents to $2.00, with $1.00 dollar being the average.

And while I can't be guaranteed that they are all 100% vintage, I think the vast majority of them are.
(And does it really matter for the purpose I am using them for?)

(Photos are from my rather humble phone camera, 
thus quality isn't supreme, but the layout looks lovely, don't you think?)


 Look at all those fun shapes! 
Doesn't it just make your imagination take off flying in new directions?
(One is actually a jello mold, can you spot it?)

Below are two recent pieces begun with my new found cookie cutter inspiration...


On the left is "Chicken Pox" and on the right is "Owl and Moon". 
Below them is a ruler, so you can see how small the pieces actually are,
and above them are the cookie cutters I used to begin the design process.


Here's a close up of "Owl and Moon", so you can see all the tiny punched stitches. (I tend to punch a bit more densely then some of the tutorial examples I have seen, but I like the look, it works for me.)
I began with the shapes of the cookie cutters, then used my imagination to fill in the rest. I'm working with solid 8/2 cotton yarn and changed my colors frequently to achieve the look that I wanted.


Here's a close up of "Chicken Pox", (thought long and hard to come up with that clever name!)
Again, I used 8/2 cotton yarns, 
and simply echoed the lines of the shapes, over and over, 
frequently changing colors as I went along.


Both pieces are now available in my shop.
To see more of either piece simply click on the link below them


Hope this post inspires you all as well!
xo


Thursday, June 11, 2015

Brunners Grove Quilt


Here's the second quilt in my new "Lancaster County" series. I just finished this one yesterday and am very happy with it. As with the first one, I took the name from a local road. 
We've got some great road names around here that just seem so fitting.


More wonky shapes to reflect my love affair with all the misshapen old barns.
(I wish I could save them all... so many of my favorites have been lost over just the last few years.)


And letting the rolling hills and the plowed fields inspire my quilting has been great fun.


More details can be found here.

xo


Wednesday, May 27, 2015

Mohns Hill Quilt


Anyone who has been a reader of my blog for any length of time, or familiar with my work, knows that I keep coming back to my neck of the woods, Lancaster County, PA for inspiration. So, it dawned on me that I just needed to do a series of Lancaster County Quilts. 

Minimalistic, abstract quilts that try to capture 
the feelings and impressions that fill me as I travel around here, 
and the deep affection that I have for it.

"Mohns Hill" is the first of these quilts.


Named after a local road, (which I plan on doing for all quilts in this series) 
the appliquéd pieces draw on the off-kilter shapes of the old worn and weathered barns, 
and the quilting reflects the beautiful landscape of rolling hills and plowed farm fields.


Made with assorted shot cottons, (including the woven selvages of some, as they were just too lovely to cut off) along with some homespuns and a pretty flower print, it also has a faced binding. 
(Never done a faced binding? See my very easy tutorial here). 

Quilt is currently for sale in my Etsy Shop.

And speaking of inspiration, I'd love to hear what inspires you all...
Do you find yourself revisiting themes or sources of inspiration?
Do you gather your inspiration from a special place close to your heart or a favorite subject matter?
Or are you more inspired by technique, fabrics, colors?
tell me what inspires you in the comment section, and how do you stay connected to it.
It's an on going source of fascination for me and I'd love to hear your thoughts!